The Week In Cameras
Latest News About the Tools We Use by Michael Murie
Using a Home Projector for Rear Projection

Rear projection, a technique that involves projecting a background image onto a screen behind your actors, is a technique that was popular in the 40s and 50s, particularly for shooting vehicle interiors. It wasn’t perfect; the image can seem washed out compared to the foreground actors making it easy to spot the technique, and rear projection requires a fairly large studio space.
Rear projection has been mostly replaced, first by front projection, and by blue- and green-screen techniques. Even low-budget NLEs now include very good green-screen filters that produce excellent results; though it’s your technique when shooting the footage that can more greatly impact the results than the quality of the green-screen software you are using.
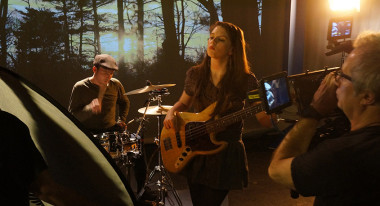
Rick Macomber recently invited me to a studio shoot for a music video where he would be using a projector to create the background. This wasn’t true rear projection; the projector wasn’t behind the screen, it was in front of the performers. This meant that the projector had to be high enough — and the performers far enough away from the screen — that the projected image wasn’t touching their faces. You couldn’t do this in a 20-foot space, but in this medium-sized studio — which admittedly also had the advantage of high ceilings — it was quite doable.
The studio being used was about 50 feet deep and the background being used for a “screen” was an off-white curtain that was not designed for screen projection. Macomber had previously tested the technique with an old 4 by 3 projector, but it didn’t work well; there wasn’t enough contrast and with the 4 by 3 format the image wasn’t wide enough to fit the band into the shot. Because of this, Rick bought a Vivitek D950 1080p HD home projector. This 1080p projector costs less than $1,000 and is very bright for its class, pumping out 3,000 lumens.
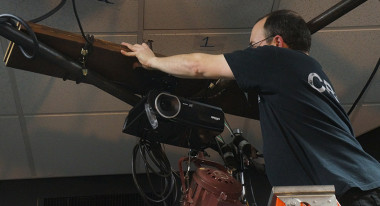
The first issue in setting this up was suspending the projector: the projector had to be high enough to project over the head of the performers. The first thought was to hang it from some chains from the light grid, but then it was decided to put it on a couple of boards between ladder legs. That worked but it was decided it wasn’t high enough, so the board was then put on the light grid, with the projector hanging upside down.
A Western Digital WD TV Live was used to play the video, and it was placed on top of the board that was holding the projector.
Most projectors have an option to adjust key-stoning, the distortion caused by the screen not being parallel to the plane of the projector lens. This wasn’t necessary in this case due to the distance from the screen; there was very little distortion in the image.
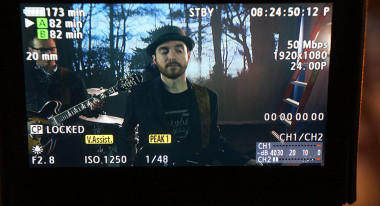
The background image was a time-lapse taken in the late afternoon. The sun is setting and the image is fairly high contrast, which perhaps maximized the effect; though even when projecting other video examples, the projector looked very good.
I was amazed at how bright the projector was; given the size of the image (about 40 feet across) and the fact that the curtain wasn’t a real projection screen. The room was darkened, but it was still quite impressive.
One of the advantages of shooting with the new digital cameras like the Canon C300 is that they are very light sensitive, and produce little noise at high ISO, so the other lighting could be subdued. Rick was shooting at 1250 ISO.
There were a few unexpected problems; the remote for the projector seemed to be a bit prickly, and the clip that Rick thought was an hour long would stop playing after about 15 minutes. Which underlines another problem; it’s hard to diagnose your equipment issues when the equipment is hanging six feet above you.
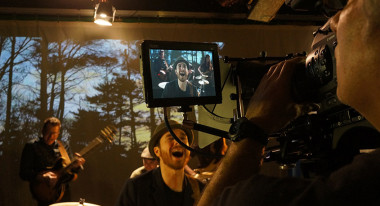
In the final clip you can tell that the background isn’t “real,” but I think the effect is quite stunning. I don’t know that I’d recommend it for inserting into regular footage, or to rear project your car chase, but for dream or similar sequences it could be a very useful technique.
Said Macomber, “We managed to get the band and the drummer into the shot. I did have to crop them in pretty closely as they were quite a bit forward from the screen. They had to stand in a specific location in order to crop it so you couldn’t see the edge of the curtain. That’s why I couldn’t do the typical reversal shots where I’m behind the band and behind the drummer, because then you wouldn’t get that magical look as if you’re in the woods with the band.”