Say it Again: How to Do No-Budget ADR for Independent Films
My first feature, Veer!, was shot primarily on Super 16mm, on an old Eclair ACL I got off eBay. While it shot beautiful images, the camera sounded like a helicopter taking off when rolling. Interior dialog scenes were especially nightmarish for sound, and one scene in particular retains no original production audio because of this. We had to re-create the scene’s audio — dialogue, background ambience and foley — completely from scratch. But when I point out which scene it is, people don’t always believe me. Indeed, good ADR goes unnoticed, and as much as I’d like to pat myself on the back for my audio skills, I actually re-recorded ADR for that scene again and again because I like to learn things the hard way.
Automated dialog replacement, better known as “ADR”, is anything but automated. It’s a lot of work, but when done right, can make an incredible difference in a film’s audio. ADR is the process of re-recording pre-selected lines of an actor’s dialog, after principal photography, which is then mixed back into a film’s soundtrack, replacing original production audio, in order to clarify or even change certain dialog.
Now before I get too far ahead of myself, let me make one grave admission: I am not a professional sound man. I just got tired of hearing we’d need $20,000, which we didn’t have, to fix our audio (mostly ADR) in Veer! Rather, I read every article I could find on the subject and geared up for some trial-and-error-style learning. And let me tell you, there were lots of errors.
Even as I began my post-audio journey on Veer!, I still saw ADR only as a tool to fix mistakes, not for its value to clarify dialog, enrich performances and raise the overall experience of a film. (We’ve all heard the story of Marlon Brando mumbling his way through The Godfather, much to Coppola’s chagrin, knowing that he would have the opportunity to re-record his dialog later and, in his eyes, improve his performance. He did, in fact, do that and, over the years, I’ve heard as much as 50% of his dialog in the final film is ADR, and it’s flawless.) At the time, I had the misconception that production sound (no matter how it actually sounded) was more truthful and honest even if the dialog wasn’t always clear. But filmmaking is, almost by definition, the search for truth through every manner of deception. What I realized over time was that whenever an audience is straining to hear or understand dialog, you’re losing them (duh, right?).
Yes, I know what you’re thinking – ADR is a high-budget tool. Big productions spend a lot of money getting their actors into a dubbing studio, re-recording select dialog which is then mixed back into the film by re-recording Mixers, people who are not only very good at their jobs but have access to audio equipment worth the GDP of small island-nations.
But don’t be discouraged! It is, in fact, possible to create good, cheap (albeit time-consuming) ADR with most of the same audio recording equipment you used to record sound on your low-budget film in the first place.
If good ADR is unnoticed ADR, then the big giveaway of bad ADR (more than perfect sync) is that the sound doesn’t “fit the space” of the scene. And by that, I mean, an actor speaking in a marble hallway sounds like he’s in a deadened audio booth, or the reverse. I found that “fitting the space” could be broken down into two recording aspects – the acoustics of the space the ADR is recorded in and the proximity of the actor to the microphone. Along with performance and synchronization, these are the four main aspects I look at when considering ADR.
Acoustics: re-recording mixers rely on a lifetime of experience and top-of-the-line equipment to make a particular line of ADR, recorded in an audio booth, “fit the space” of wherever they’d like. But with many independent filmmakers unable to afford that kind of post-production audio work, as I was, the easiest workaround I found is to (as close as possible) record the ADR in the same space in which you filmed. Sound crazy? Well, the benefit is that it puts the dialog in that space and provides the subtle echoes, reverberations and nuances which occurred naturally during production, making it much easier to mix ADR and production dialog down the road. If you can’t get back to your shooting location then find a suitable substitute, a space of similar build and shape. The obvious drawback to location sound recording is the lack of control. Sometimes you’ll have to wait for a lawnmower to finish outside or ask the neighbor to turn down their music… just for 20 minutes… just to get three lines.
Proximity. Not to be confused with volume, proximity is how up-on-the-mic an actor sounds. It’s the difference in sound quality between a shotgun microphone and a lapel lavalier mic. Whispers and intimate moments tend to have closer proximity than arguments, for example. An actor should sound closer to the microphone in a tight shot than in a wide shot. (For close proximity, think of the sound of an NPR host close to their radio mic versus an actor in a TV or film scene mixed to sound more appropriate to the distance an actor is from the camera in a particular shot.)
Synchronization. This seems to be the most intimidating factor to many, yet I found sync-ing to be the least worrisome. In fact, I found the other three aspects were all more important to selling ADR than a perfectly-synced line of dialog. Yes, it’s time-consuming, and you may try each line 10 or 20 times. And even then, I sometimes found myself cutting sentences or syllables up and bumping them a frame or two to match, but it’s nothing that a little time and effort can’t accomplish. If an actor can get the cadence and tone down, it makes sync-ing that much more fluid.
Performance. Remember, this is still a performance. A re-performance, and some actors are naturally better at it than others. I had more difficulty getting actors’ ADR lines to sound emotionally-correct than exactly perfect for syncing. Reassure your actors that you want them to put performance ahead of sync, it’s a great way to relieve nerves.
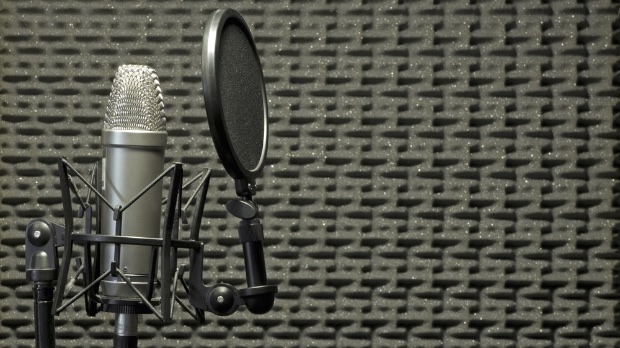
Now, let’s dive into an actionable workflow. You’ll need a shotgun microphone and boom (preferably what you used during production), a wireless lavalier microphone and a portable audio recorder, like a Zoom H4n.
WORKFLOW
* Transcribe the lines which need to be re-recorded. Include all the stutters, “uhms” and “likes” because that is what you’ll be recording (assuming you can see the actor’s mouth on screen, otherwise you’re free to record virtually anything that’ll fit for time). Don’t bring the script because what’s in the script doesn’t matter anymore, only what the actor said onscreen.
* Export the film clip or scene in question onto a laptop or tablet for easy portability around your recording locations.
* Once in the recording space, double-mic the actor. Use a shotgun microphone to boom the actor and a wireless lavalier microphone (even if the original shoot didn’t lav them) clipped onto their shirt collar. Having both a boom audio track and a lavalier audio track allows you to play with proximity in post. More on this later.
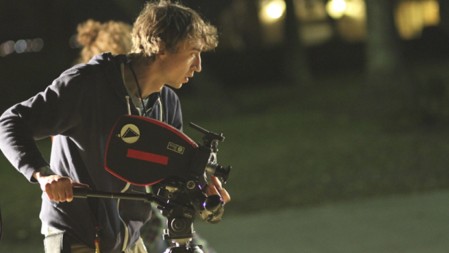
* Set up your boom microphone at the same distance and angle as it was during shooting, both in regards to the space itself and to the actor performing dialog, with the actor in the same position and space as during production, again, as closely as possible. We fudged different rooms in my house for quite a few spaces. (See illustrations)
* Let the actor review a copy of the transcript, being very specific to point out stutters and filler words. Show them their film clip a few times to get the cadence, tone and emotionality – then take it away. (I almost always got better ADR performances when the actor viewed their respective clip several times, then tried a few dialog takes without a reference. I think this was due to the fact that when an actor watches their film clip as they record, they spend a majority of their brainpower trying to sync the line perfectly, versus giving a performance for the line. Remember, they’re still acting.)
* With their line fresh in their mind, go right into recording. Let the actor run through their line(s) a few times, then re-watch the clip and see how it feels. Do a few more takes. (Another important aspect of an ADR “performance” that made a difference was body positioning. If an actor is sitting onscreen, have the actor sit for the ADR. If they are standing onscreen, have them stand. If they are balancing on one foot onscreen, have them balance on one foot. There are slight variances in voice and tone, brought on by differences in concentration and the tightening of different muscles, that lend themselves more to a quality which matches the images onscreen.)
*After you’ve gotten the magic take, have the actor do one more a little faster than they think feels right and one a little slower. Occasionally, what sounds too fast or too slow is just right.
* Get a minute of ambience or room tone. You’ll use this later to smooth out any bumps and kinks in the ADR.
* Back in the edit bay, import your audio. Chop it up in your timeline and eyeball which of your ADR waveforms seem to match up best with the waveforms of your production audio. (This simple method works surprisingly well). Occasionally, I found myself bumping certain words or syllables by a frame or two to match lips, but not too often.
* When you’ve found a good line match, kill the production audio (but never delete it from your timeline). Assuming you’ve recorded to a Zoom H4n, or similar portable recording device, your audio will come in as a single track with a left and right channel. One channel will be your shotgun mic and the other will be your lavalier. Unlink the right and left channels of your ADR and, keeping them sync-ed, center both. Now you can separately toggle the volumes on these two channels allowing you to control the proximity effect of the audio – more lavalier sounds closer, more boom sounds farther – while keeping the overall volume of the line the same. Most lines will end up being a mix of shotgun and lav audio. (see screen grabs)
* Finally, underlay your room tone or ambience to smooth out the ADR. You may also have to foley any sound effects that were on the production track under the dialog, as those are now gone too.
I’ve had good results with the workflow described above. In fact, at my hometown film festival in Jacksonville, Florida, after the screening of Veer!, I had a local producer approach me. I was eager to get her thoughts on the film. While I’m not sure she cared much for the film, but she did ask me one question: “Who did your sound?”
FOOTNOTE: The part that I left out, which my friends tell me was completely crazy, was that we recorded all exterior ADR outside, because short of getting into a studio, it’s really tough to get indoor ADR to sound like you’re outside. I kept mover’s blankets in the trunk that summer to throw over a noisy A/C units in a pinch.