Getting Started in 3D
I had the good fortune of attending a day-long workshop on 3D production this past weekend. It was notable because we had a chance to actually use the Panasonic AG-3DA1 camcorder and to view the results projected using Panasonic’s new home 3D projector, the PT-AE7000U.
In the interests of full disclosure; I have previously written at some length about my suspicion and distrust of the whole 3D thing. I blame it on seeing Jaws 3D in 2D at a drive-in movie at a formative age. To me, 3D seems to be an effect that is useful now and again, but can just as much distract from, as add to, the story. It’s not something that should be used for the majority of productions.
This workshop didn’t really change my opinion, but it was certainly a good learning experience.
At $16,000, the AG-3DA1 is hardly inexpensive, but it does make 3D production a lot simpler than using a rig and two separate cameras. Everything is bundled together into a fairly light and simple-to-use camera that doesn’t require lots of adjustments.
It also has a number of drawbacks; you can’t adjust the interaxial distance (the distance between the lenses), and at its widest, the lenses are about the equivalent of 50mm. The convergence can’t come much closer than about four feet, and adjusting convergence on the fly is hit or miss. Convergence is the point at which the lenses are crossing, defining the point in space in the image that appears to be “on” the film screen. Objects behind the point of convergence appear to be behind the screen, while objects in front appear to be in front of the screen.
The camera itself is pretty straightforward to use. It has only a couple of “3D” controls; a convergence switch and a 3D guide. The iris/convergence switch lets you switch between adjusting the iris or the convergence of the two lenses using the separate roller-type switch. I’m not sure this is the easiest way to adjust convergence – particularly while shooting – as it’s a fiddly little adjustment. If you want to adjust the convergence as the camera (or the subject) moves, it’s going to take some practice. You really need something like a focus control ring.
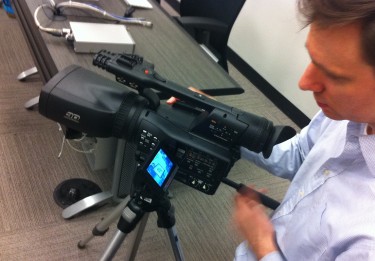
The 3D Guide provides an indication in meters of the convergence point and the range in the scene that can comfortably be viewed. It’s purely to provide a suggestion of how to set things up.
One of the many new things you have to deal with in 3D is the arrangement of objects in the scene in front of and behind the point of convergence. This is part personal preference, part physiology and part magic; how much 3D effect is enough, and how much is too much? Focusing on things that are too far from the point of convergence, or things that are cut-off at the edges of the scene, can cause disorientation for the viewer. This may be a good thing, or it may just make the audience nauseous.
As a personal preference, I found that I didn’t like things being in front of the screen unless they were only there for a very brief period of time. Those images seemed out of focus, and just “wrong.” However others in the group didn’t seem to react as viscerally to those moments.
Another problem with 3D is that “how much” depends on your target playback device; something that works on a mobile screen will be too excessive on a large screen, while the 3D effect that works for the large screen may not be noticeable on a small screen. Being able to see the images projected on a large screen really made a difference. At $3,000 the PT-AE7000U is an impressive projector, though we had one problem when we discovered that it didn’t support the 1080 30p video format. It worked fine with 24p and 720 60p video, but it wouldn’t project 30p.
Here are some lessons learned from the experience:
Test early, test often
This should be true of all new cameras; you don’t want to start shooting something important the day you first lay your hands on the camera. But if you have never shot in 3D before, you’re in for a bigger learning curve. You’re dealing not just with the camera (or 3D rig) but with the new grammar of 3D shooting. Plan to shoot lots of material, then review it under different conditions and show it to different audiences to figure out what works and what doesn’t.
3D changes how a scene looks
This isn’t unexpected – you’re adding 3D after all – but it can change your shots in unexpected ways. The 3D effect can cause your eye to be drawn to things in the scene that you might not usually expect; in one shot the edge of a long bench drew my eye away from the people sitting on it because the bench had such a sense of depth to it.
Transitions
When cutting between scenes you have to be careful about where the convergence point is when the cut occurs. If the viewer has to suddenly change their convergence point, it can become quite disturbing. This is not something we have to think about when shooting in 2D.
Edges
You have to be careful about how you frame your subjects in a scene, and how they are “cut” at the borders on the screen. Again, this is not something we have to deal with in 2D shots.
So if you are planning to shoot a 3D movie for the first time, my advice is that the second movie is the one you’ll want to show people.