Lessons from the Cutting Edge Tour
I spent a half-day at Adam Epstein’s “The Cutting Edge Post-Production Tour” last week. Epstein, who is the editor for the Saturday Night Live Film Unit, has spent the past month and a half traveling the country presenting on how to be a better editor. Unfortunately for me, I couldn’t stay the whole day. Unfortunately for you, the tour ended this week, so you’ve missed it too.
If you can come away from an event like this with an actual tip or technique that you start using and with one piece of inspiration to improve how you work, that actually makes you change what you’re doing, then I think you’ve got your money’s worth. By that measure I think this class was more than worth it.
Here are two or three of the things I took away from the session:
The Tips
Epstein explained how he organizes his files for each project in a particular folder structure, which he then duplicates inside the Project window of Premiere. “When you start a project, start clean immediately, so it doesn’t get out of control,” he advises. That wasn’t actually a new idea for me, though his segmentation into effects, audio, clips and so forth was much more granular than the structure I typically use of having one media folder inside a project folder.
He also mentioned a utility he had only found out about “a couple of stops ago” called Post Haste that he is now a fan of. It creates empty folder structures on your drive for you.
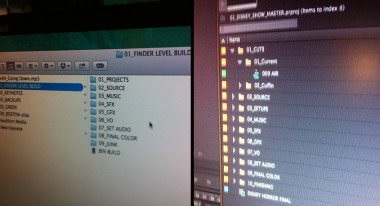
On the topic of importing clips, Epstein said, “I prefer to do my own organization at the Finder level because then it’s called what I want it to be called. And then I can put it where I want it to be, and bring it in to whatever bin I want to bring it in to. Forcing yourself to do your own base organization lets the whole thing run smoother because you know where you put stuff.”
In the Cuts bin in Premiere he keeps two bins; one called Current and the other called Coffin. In the Current bin there’s always one cut “because when someone says what’s the latest cut, that’s the latest cut. I don’t have to think about it.”
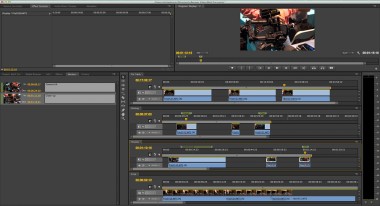
Epstein also explained how he organizes and chooses between multiple takes. This was a revelation to me. Instead of placing clips in bins, then previewing them and choosing the one he wants, he creates separate Setup Sequences in Premiere Pro that contain all of the takes of a specific shot. Then he creates a project window with the multiple sequences visible so that he can preview clips quickly and easily and move them from the setup sequences into the current timeline.
He also likes to use markers to indicate parts of takes that he likes. He said, “I like to work in something called Setup Sequences. By that I mean, I have all these sequences and they’re labeled by scene number. This is Scene 109 and this is Scene 112. The reason I like this is, one, I like to be able to go to an icon view and get a nice visual of the individual setups. This is reminiscent to me of working in film back in the day and you had a bin and some strips of film hanging above it. People would say, ‘What’s take two?’ It’s the second strip in. I like that visual sort of reference.
“But what I like even more is that I can see more information for more things at once. If I have my Markers Window open I have individual information that I put in there. I can see the notes I’ve added to three clips at once as opposed to having to go into the bin and double-clicking on one clip to see what I put into that and then clicking on another clip.”
The Inspiration
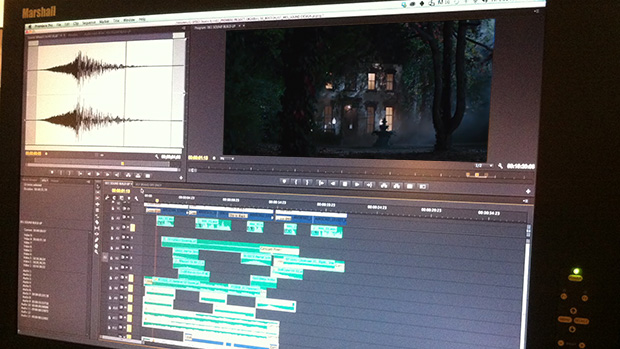
Epstein is primarily a video editor, and when he works on Saturday Night Live the final audio mixing is done by another production house – he’s careful to say he’s not a mixer – but he also builds most of the sound picture himself.
First asking the question, which is more important, picture or sound, he showed a clip from an action movie, then showed it with the picture heavily degraded, and finally with the audio heavily degraded. His point: it was harder to watch the clip with the audio degraded.
He demonstrated how he builds up the sound for a sequence using as an example the trailer from The Midnight Coterie of Sinister Intruders. Using just a few seconds at the beginning of the segment, he broke it down into the many parts he’d added: night sounds, footsteps, musical hits and other audio. “Layering, layering is the key.”
http://youtu.be/gSEzGDzZ1dY
While the discussion might have been specific to that segment of the trailer, the ideas presented about layering, adding music and building a sound picture were revelatory. I’ve seen people demonstrate building the audio for a scene before, but sometimes you have to see (or hear) something three or four times before you really understand. And then your journey begins.

But “The Cutting Edge Tour” is over. On the bright side, that also means Saturday Night Live is back on the air this weekend.
Filmmaker: Adam Epstein Talks Editing for SNL and “The Cutting Edge” Workshop