One Brick at a Time: the Post-Production of A LEGO Brickumentary
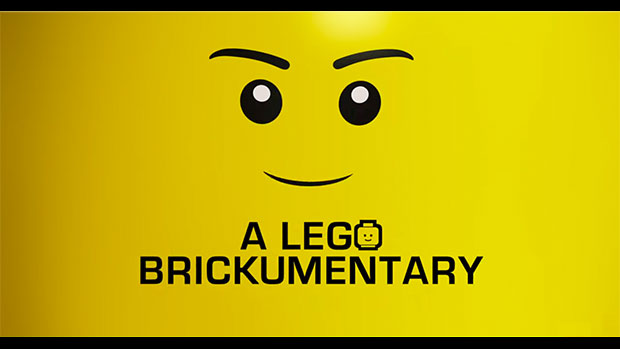
A LEGO Brickumentary, a documentary that looks at the culture and appeal of the LEGO building block, opens July 31. Like many historical documentaries, this project involved working with a wide range of archival footage, but it also made use of footage shot with a wide range of modern cameras — in one case, all shooting the same event.
Co-producer and post-production supervisor Chad Herschberger of Milkhaus talked to us about the work they did on this documentary and the ins and out of post-production work, including animating faces on LEGO bricks, moving media between Avid Media Composer and DaVinci Resolve and dealing with many different camera formats.
Filmmaker: How did you get involved with the documentary?
Herschberger: A LEGO Brickumentary was co-directed by Daniel Junge. He’s a Denver-based filmmaker that we’ve been lucky enough to have a long history with. Another partner of Milkhaus, Davis Combe, has edited the vast majority of Dan’s films, and we’ve done post-production on many of his films, including Being Evel and Saving Face, the film he won the Oscar for.
Filmmaker: What was your involvement?
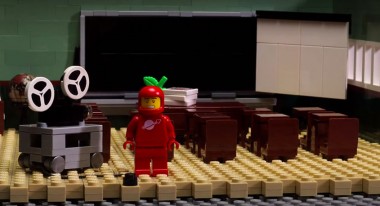
Herschberger: My role primarily was as post-supervisor, but I was an editor on many of the scenes, and I was also responsible for designing and executing the workflow around all of the animations that are in the film. There are seven or eight stop-motion sequences in the film, and we reached out to a group in L.A. that did Lego stop motion and had them film all the animation as traditional stop motion but with all the characters having blank faces. Then we went in and motion tracked all of the minifigures and added faces and lip-synch animation.
Filmmaker: What did you do the animation of the faces in?
Herschberger: That was all done in After Effects. We downloaded a catalog of all of Lego’s faces and from those we created a library of mouths and eyes and facial expressions. We did all of the lip-sync animation in a piece of software called Toon Boom. It’s actually a really great piece of software if you’re an animator, particularly if you’re doing lip-sync stuff. It’s got some really great tools where you can assign particular sounds to different mouth shapes and then it will do an automated pass and make its best guess based on the soundtrack of what the faces should be doing. Then we go back and clean that up and export that as a .svg file out of Toon Boom and bring that into After Effects and track it and composite it from there.
Filmmaker: What was it edited in?
Herschberger: All of the editing was done in Avid. The film originally started in Final Cut 7, but when the film came back to us for finishing it was in Avid so we finished the film in Avid. We graded in DaVinci Resolve.
Filmmaker: How did this project differ from other projects?
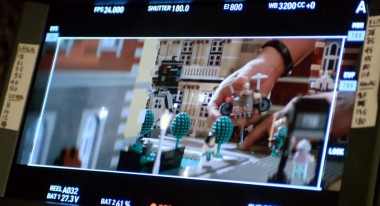
Herschberger: Definitely one of the biggest things for us was the scope of the production. It’s not unusual for us to work on documentary films where there’s a B team going out and getting extra stuff, but in this instance, almost every different storyline was captured by a different crew. We did our best to maintain some standards in terms of the equipment that was being used, but at the end of the day there was a lot of different cameras involved, and there was a lot of different standards involved.
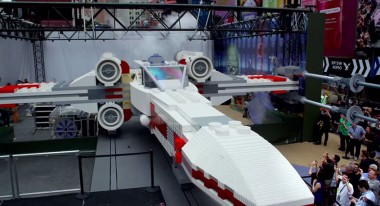
We had crews out in Asia that shot stuff at 25 [frames per second] — they must have missed the memo — so there were a lot of different sources and a lot of different cameras, and there were a lot of different frame rates and on top of that there was some archival material that we pulled in. There was also a lot of crowdsourced material. For the X-Wing reveal in New York we had many cameras, but we also tapped crews from Cartoon Network and some other news agencies were out there covering that event. I think we had at least a dozen different cameras, and if you watch that sequence I’m pretty sure that every single cut is to a different [type of] camera.
Filmmaker: Did you conform everything to a standard format?
Herschberger: Avid kind of forced our hand in a lot of respects. Avid is not great about mixing media and frame rates and things like that, so most of the footage was pre-processed. The archival stuff was ramped through our Teranex’s. For the 25 stuff, if it wasn’t sync-sound we would just re-time it. If it was sync-sound, a lot of that got ran through software processes. Because of that, it was all pretty much conformed before it went to DaVinci, at least in terms of frame size and frame rate.
Filmmaker: Were you grading the conformed material or the originals?
Herschberger: With the Canon C300 media, with a minor bit of trickery you can get Avid to read those MXF files native, so we were bringing that media native into Avid and passing it native to DaVinci. The stuff that was shot on the F3, DaVinci won’t read that media natively anyway, so that was converted to Avid MXF files, and we graded that.
Filmmaker: What advice would you have for someone who is undertaking a project like this?
Herschberger: Some of these things may have changed, but working in Media Composer 7 and DaVinci 10, the process of bringing media back in to Avid from DaVinci was a little frustrating.
If you’re working with MXF files in Media Composer 7, you can’t really replace your source because of the way that Avid wants to timestamp everything. Every time we needed to make adjustments to the color grade, we wanted to bring that stuff back into Avid, but then we had to basically re-conform the film again, and that was frustrating. There wasn’t an easy way to just replace a handful of shots within our existing Avid timeline.
The workflow that we ended up using was something we came up with after reading a lot of forums. Coming out of DaVinci is QuickTime and letting Avid create a set of MXF media files based off of that QuickTime is actually a much better workflow because then you can work within Avid’s media management system. You can go into Avid and delete an MXF file and readjust it off the QuickTime file, and you can over-write your original QuickTime file from DaVinci. So it’s one extra step within Avid, but what you also end up doing is creating a lot less media. It’s a lot easier to replace media files and not just append or add new media files.
Probably the thing that we would definitely do differently is: if we were going to try to conform back into Avid we would do that through QuickTime rather than doing it with MXF files because that was a nightmare.
Filmmaker: Did you deliver a DCP file?
Herschberger: We delivered on HDCAM for the first couple of screenings. We did eventually do a DCP with Deluxe, but we were quite fortunate that our first screeners were on HDCAM and the film got picked up pretty quickly.
Filmmaker: Any cameras that you prefer, or really don’t want to work with again?
Herschberger: That’s sort of a personal preference thing. I’ve always been more of a Sony guy and right now I really like the Sony FS7. We’ve had great success with that camera.
Filmmaker: You’d prefer it over the Canon C300?
Herschberger: My personal take on the C300 is that it’s a really beautiful camera and when you put that camera in the hands of a really good shooter you can get some pretty amazing results.
I’m not a big fan of C-Log. I don’t feel you get as much out of it because it’s not a real Log codec, it’s more of a souped-up Canon picture profile. Also, we’ve found the C300 codec to be limiting, so when you start running into field problems — underexposure, over-exposure, things of that nature — the C300 can be a lot trickier to correct than, say, the Sony F3 because there’s so much more color information in the codec of the F3 than there is in the C300. I think the C300 is a great looking camera, but I also think it needs to be shot properly to get the most out of it. I think some of the Sony cameras are a little more forgiving.
Cameras I’m not going to miss are Canon 5Ds. I think we have gotten to a place where most people are finally putting away their 5Ds and picking up something else. And if we don’t have to make 5Ds match other cameras any more, we’ll be pretty happy about that. That’s been a problem that’s plagued us for years. So many filmmakers and clients that we work with run 5Ds as their sort of B cam, and it really just doesn’t match anything. It doesn’t match the C300, it doesn’t match Sony’s — it just doesn’t match anything, and it’s such a limited codec. The Mark III was a little bit better, but the Mark II, that was not a great codec. The rolling shutter and moiré issues and everything else aside, it just didn’t have the color space to make it look the way you wanted it to.
https://youtu.be/qGC1ZoZzJ4c